> ## Documentation Index
> Fetch the complete documentation index at: https://docs.talqui.chat/llms.txt
> Use this file to discover all available pages before exploring further.
# Create Campaign
### Creating a new campaign
In Talqui, the term **campaign** refers to a structured process of sending a batch of messages to multiple contacts across various communication channels (e.g., WhatsApp, Instagram, Telegram). Unlike other platforms that may refer to these as **template messages**, Talqui adopts a more comprehensive and flexible approach by calling them **campaigns**. This is because campaigns in Talqui are not limited to just sending one type of message but are designed to manage the entire lifecycle of customer engagement, from creating content to tracking dispatch and delivery metrics.
The **campaign** is the core entity used to manage large-scale communications, allowing businesses to engage with customers through multiple channels while maintaining consistency and personalization. Campaigns in Talqui are channel-agnostic, meaning the same campaign structure can be applied whether you're communicating through WhatsApp, Instagram, or any other supported platform. This ensures that businesses can maintain a unified communication strategy across different platforms while leveraging the specific advantages of each channel. The ability to include variables such as the customer’s name or specific details within the campaign also allows for personalization at scale, making the communication feel tailored to each recipient.
Before any message dispatches, whether single sends or bulk sends, a campaign must be created. This campaign acts as the blueprint for the content, recipients, and scheduling. Once created, the campaign can be reused, extended, or modified to meet specific business needs. In this guide, we will walk you through the process of creating a new campaign, which is the foundation for any future messaging activity in Talqui.
***
## Step-by-Step Guide for Creating a Campaign:
### Step 1: Listing All Campaigns
To create a **campaign**, follow these steps:
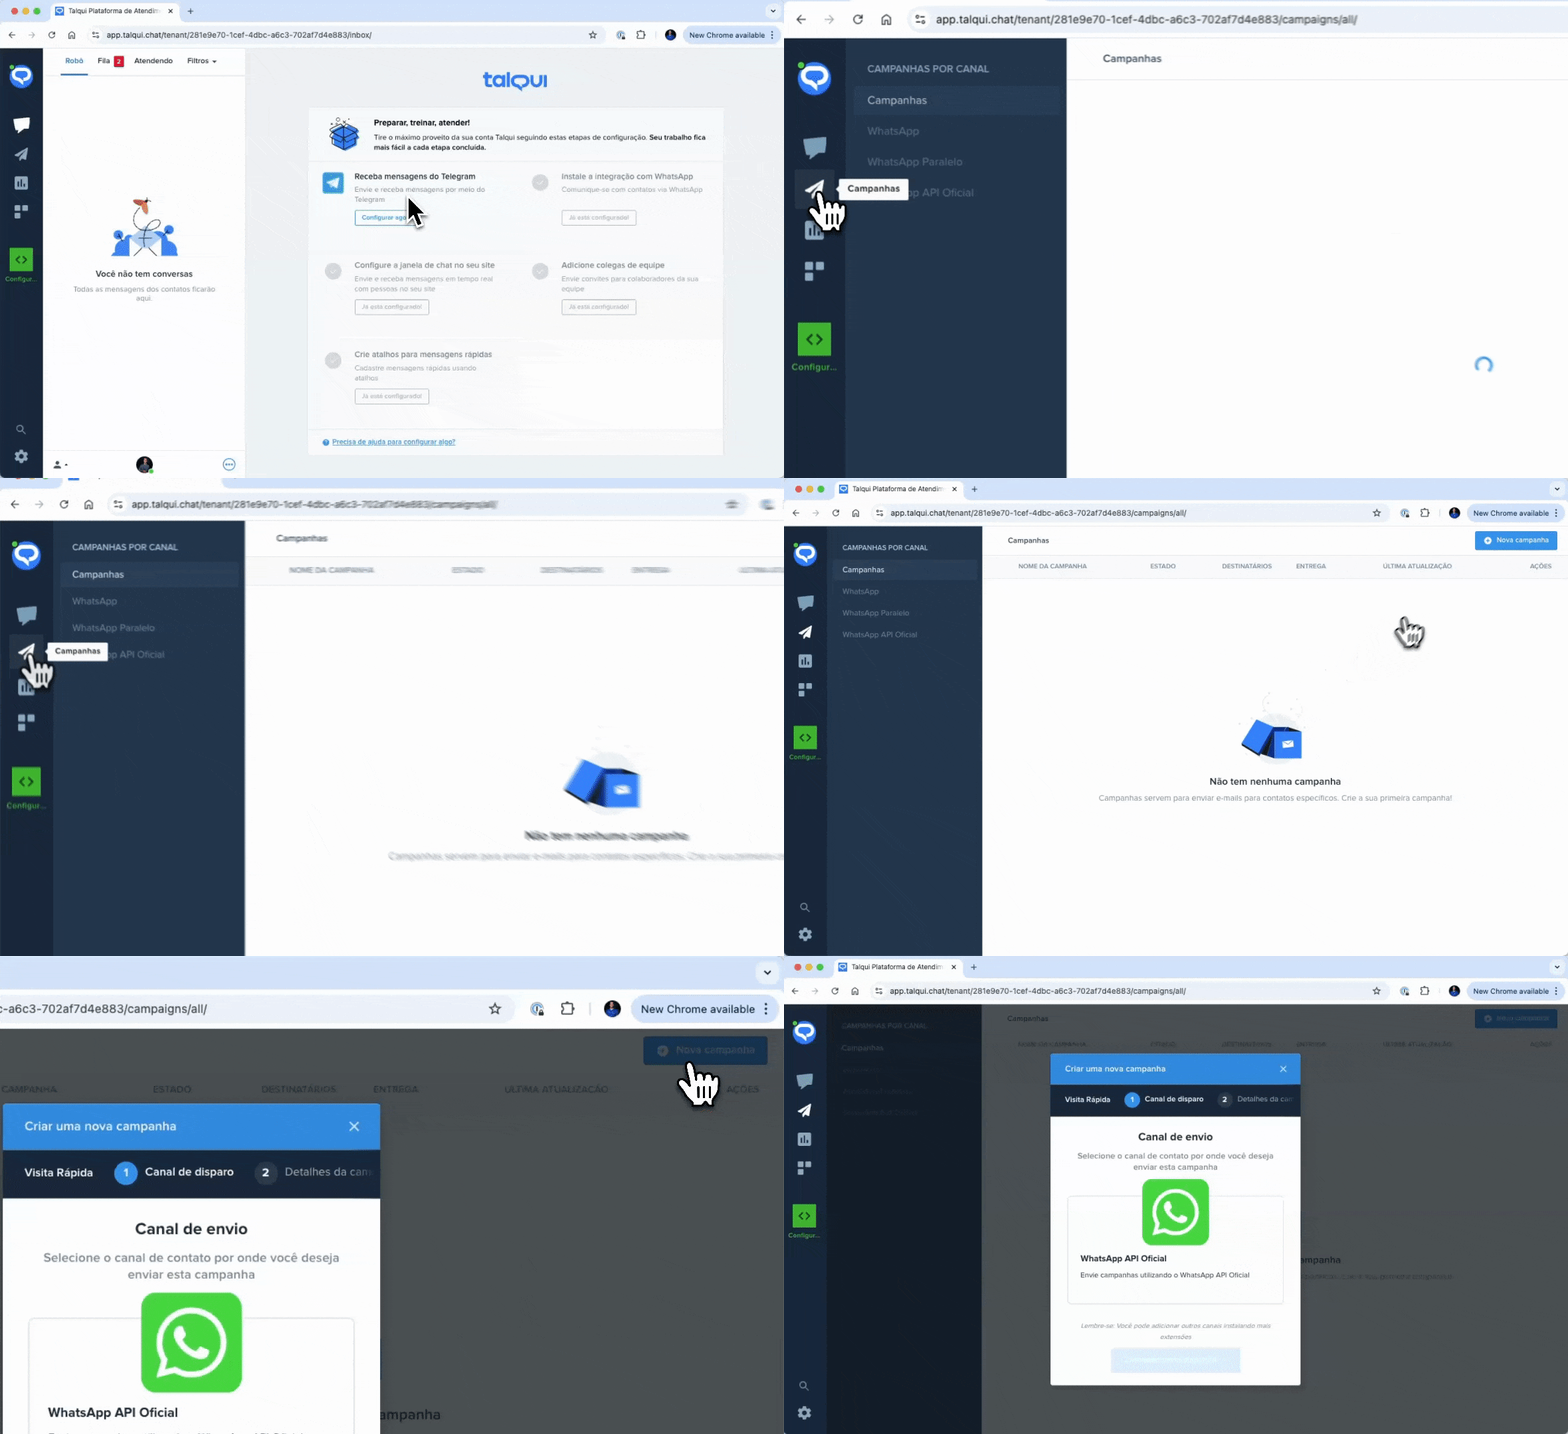
1. Access the Talqui platform and navigate to the **Campaigns** section by clicking the "Campaigns" option in the left-side menu.
2. In the upper-right corner of the screen, click the button labeled **Create New Campaign**.
3. You will be presented with a list of available communication channels. Talqui only allows you to create campaigns for channels that are already active and connected within your system. In this step, choose the communication channel through which you want to reach your customers.
4. Once the channel is selected, you will be directed to a form where you can configure the details of the campaign, including message content, variables, and scheduling options.
 ***
#### Step 2: Selecting Recipients
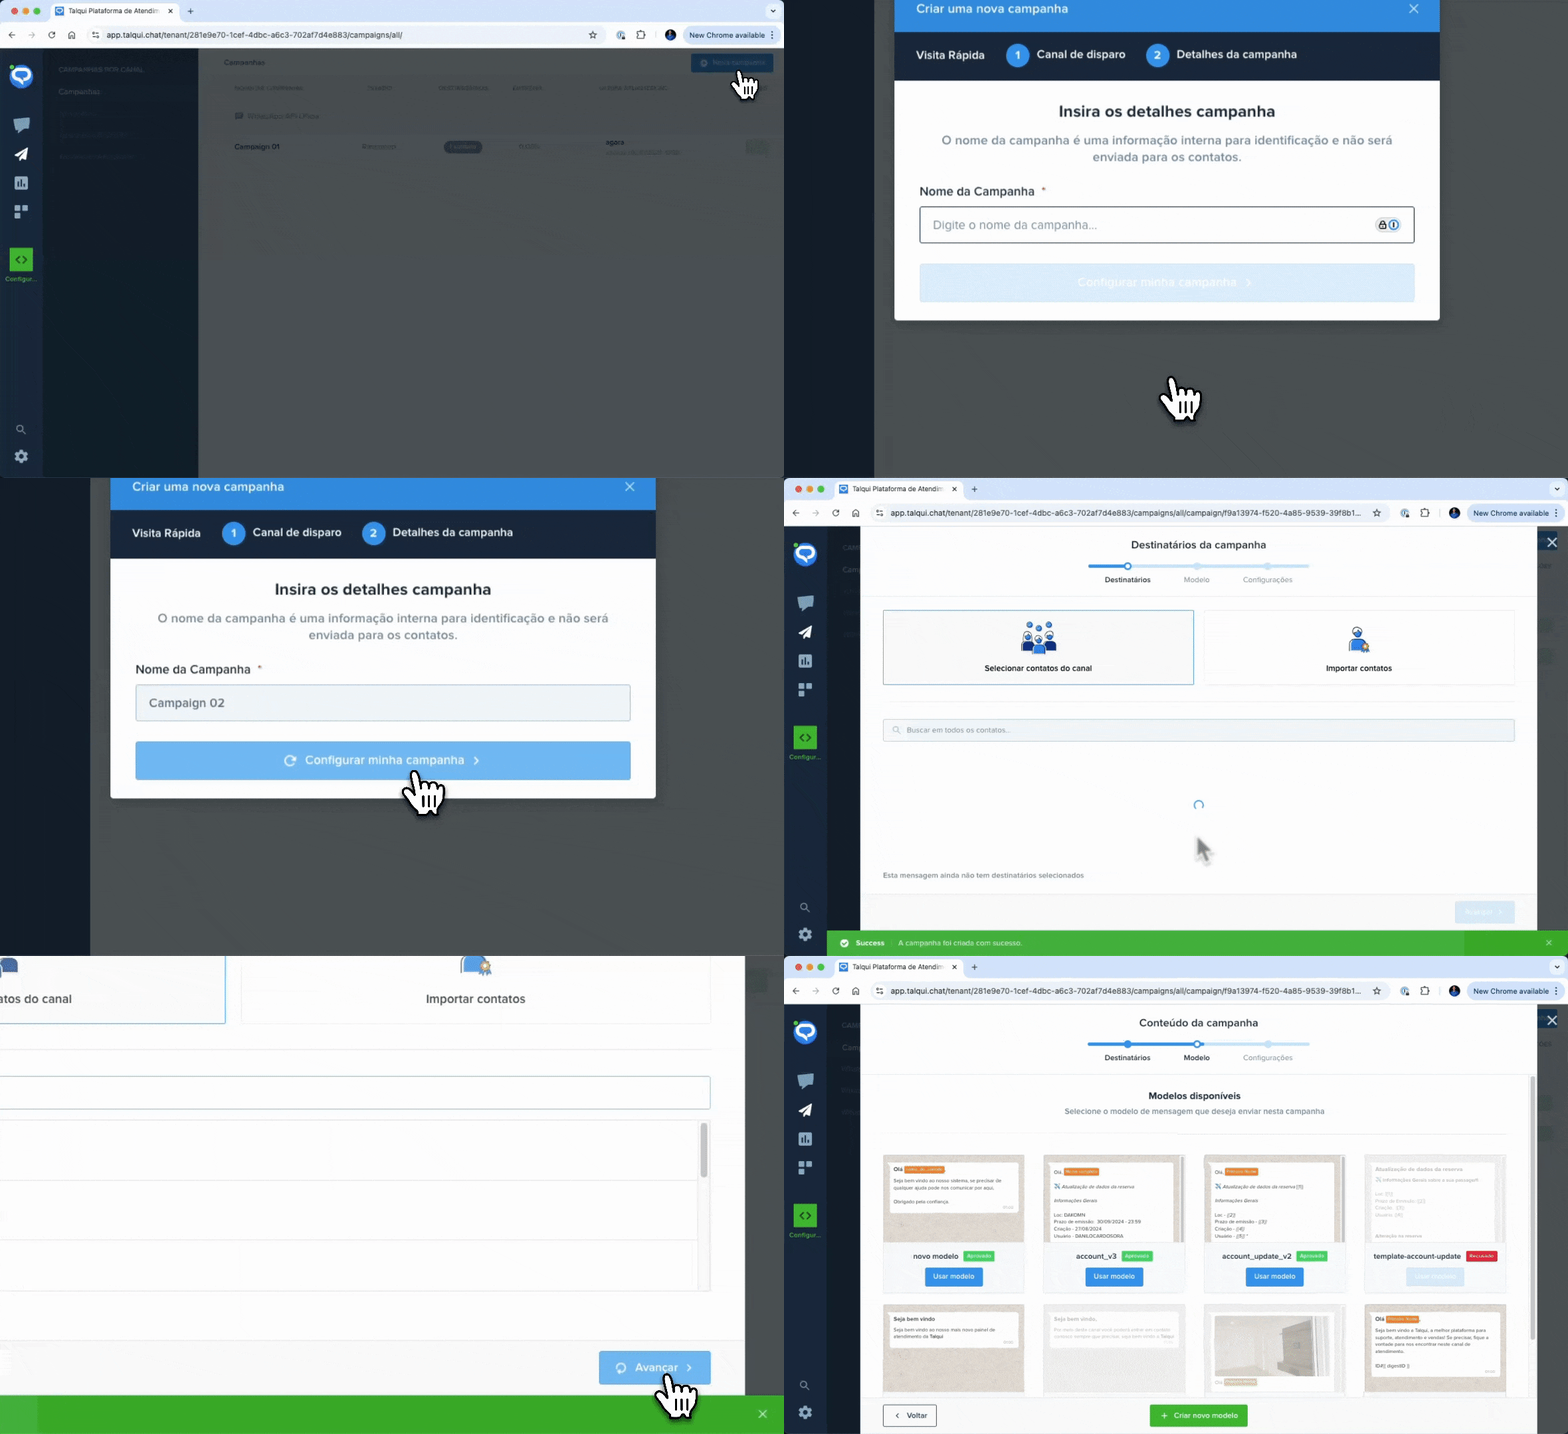
After creating a new campaign and selecting the communication channel, the next step is to define the recipients for the campaign. It is important to note that in order to create a **campaign dispatch**, the campaign must have been successfully sent to at least one contact before. The campaign’s status in the system should be marked as **sent**, **successful**, or **completed** to ensure that it is eligible for further dispatches.
1. On the recipient selection screen, choose the recipients to whom the message should be sent.
2. After selecting the recipient, click the **Next** button located at the bottom right of the screen.
***
#### Step 2: Selecting Recipients
After creating a new campaign and selecting the communication channel, the next step is to define the recipients for the campaign. It is important to note that in order to create a **campaign dispatch**, the campaign must have been successfully sent to at least one contact before. The campaign’s status in the system should be marked as **sent**, **successful**, or **completed** to ensure that it is eligible for further dispatches.
1. On the recipient selection screen, choose the recipients to whom the message should be sent.
2. After selecting the recipient, click the **Next** button located at the bottom right of the screen.
 ***
#### Step 3: Selecting Message Content
The system will now prompt you to select the message content, also known in Talqui as the **message model**. This is the template that will be sent to the recipients. You must either **select an existing model** or **create a new model**. If you need to create a new model, \[click here]\(Campaign Models) to learn how to create and configure a Campaign Model.
Once you have selected the Campaign Model, click the **Next** button at the bottom-right corner.
***
#### Step 4: Finalizing the Campaign
If the Campaign Model you selected contains variables, you will now be prompted to map those variables. A list of variables will appear on the screen, and each one will correspond to a placeholder in the message preview shown on the right-hand side. This helps you see exactly where each variable will appear in the message being sent to the customer.
***
#### Step 3: Selecting Message Content
The system will now prompt you to select the message content, also known in Talqui as the **message model**. This is the template that will be sent to the recipients. You must either **select an existing model** or **create a new model**. If you need to create a new model, \[click here]\(Campaign Models) to learn how to create and configure a Campaign Model.
Once you have selected the Campaign Model, click the **Next** button at the bottom-right corner.
***
#### Step 4: Finalizing the Campaign
If the Campaign Model you selected contains variables, you will now be prompted to map those variables. A list of variables will appear on the screen, and each one will correspond to a placeholder in the message preview shown on the right-hand side. This helps you see exactly where each variable will appear in the message being sent to the customer.
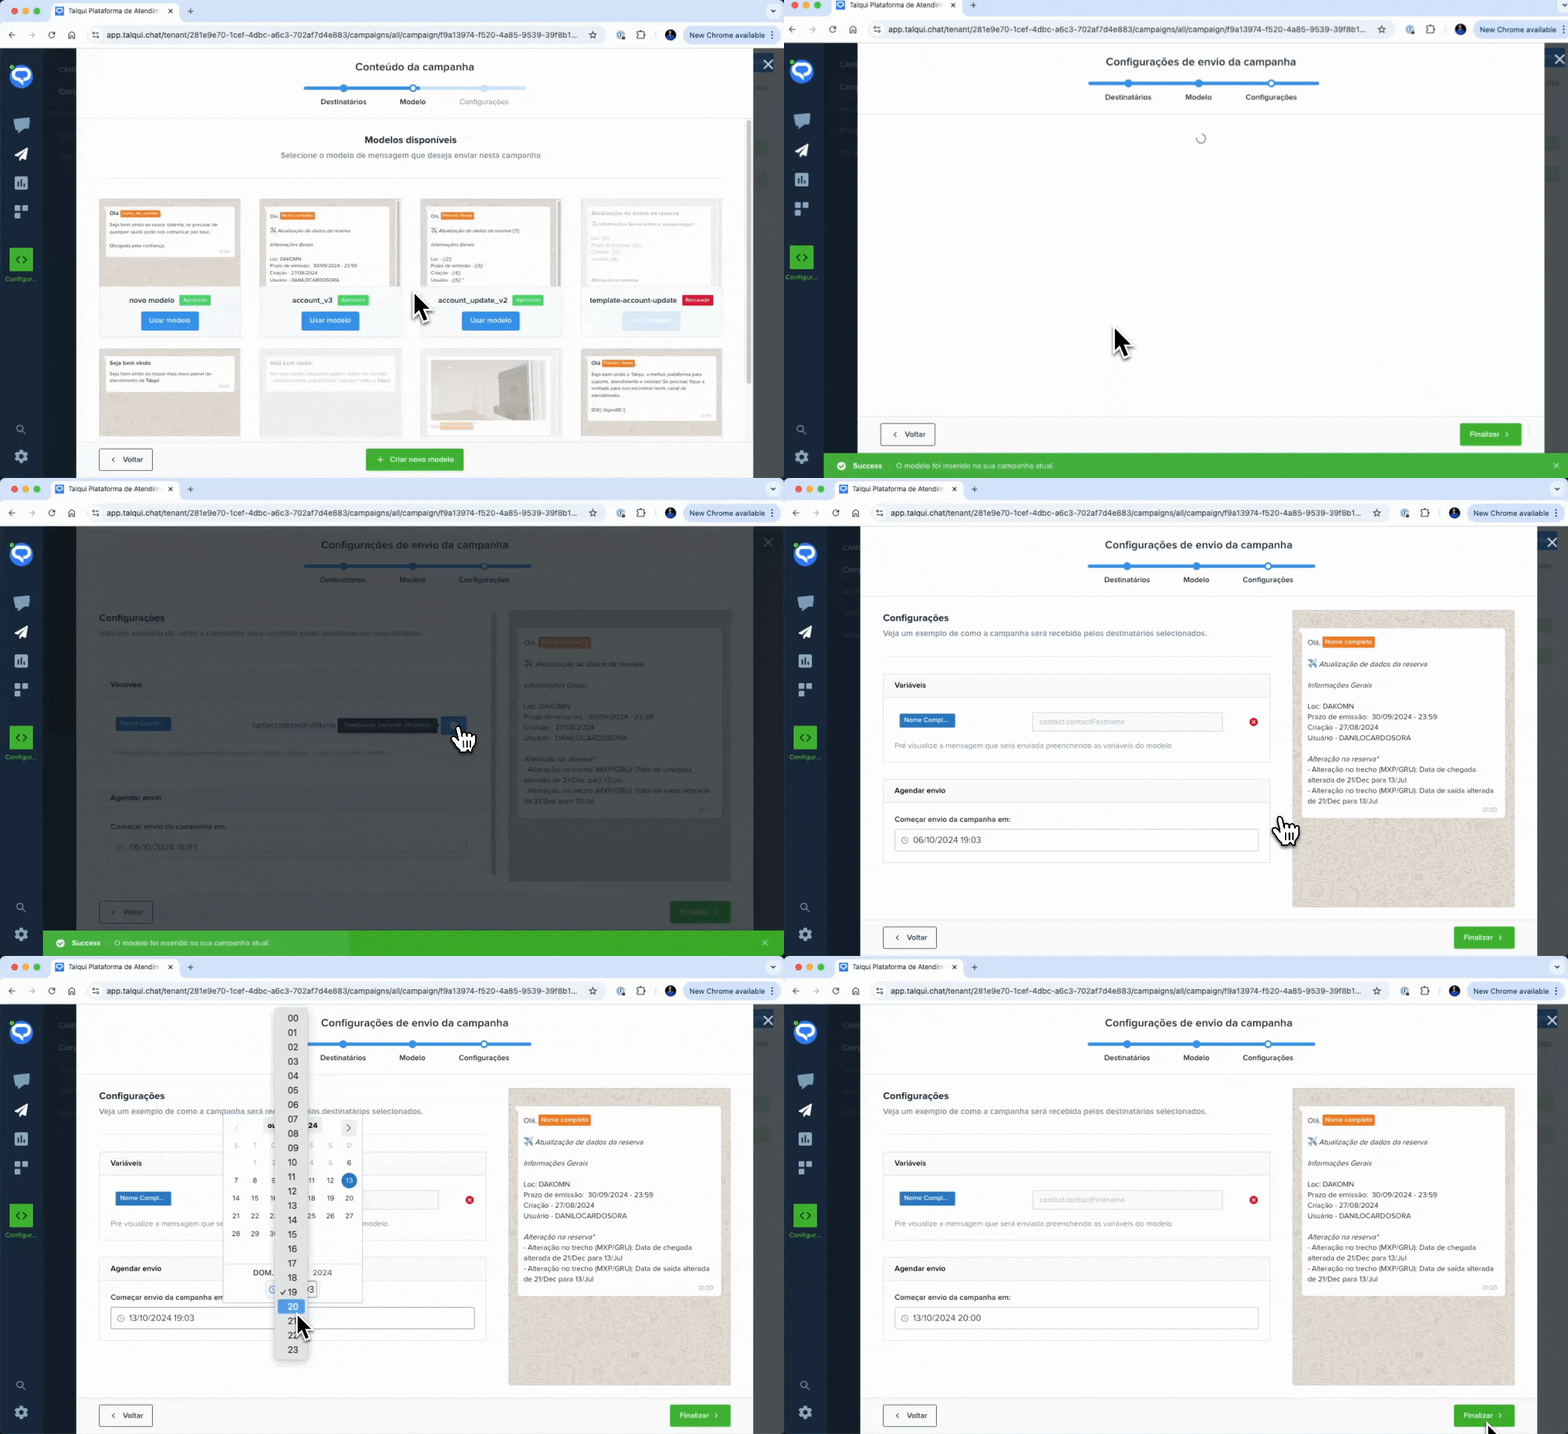 You also have the option to schedule the campaign to be sent in the future with a Date Time selection. However, for the purpose of creating a basic campaign, you don’t need to modify this field as the system automatically sets the dispatch for the current time.
Once you have completed all the steps, click **Finish** at the bottom-right corner. This will return you to the campaigns dashboard, where the newly created campaign will display a status of **Processing**. This indicates that the campaign has entered the sending queue.
This documentation is built and hosted on [Mintlify](https://mintlify.com), a developer documentation platform.
You also have the option to schedule the campaign to be sent in the future with a Date Time selection. However, for the purpose of creating a basic campaign, you don’t need to modify this field as the system automatically sets the dispatch for the current time.
Once you have completed all the steps, click **Finish** at the bottom-right corner. This will return you to the campaigns dashboard, where the newly created campaign will display a status of **Processing**. This indicates that the campaign has entered the sending queue.
This documentation is built and hosted on [Mintlify](https://mintlify.com), a developer documentation platform.