> ## Documentation Index
> Fetch the complete documentation index at: https://docs.talqui.chat/llms.txt
> Use this file to discover all available pages before exploring further.
# Getting Started
### From boilerplate to published plugin
This page ties the previous ones together into a practical path: how to scaffold a plugin from the public boilerplate, develop it locally, validate it, and submit it so it becomes available inside Talqui. It assumes you have read [Architecture](/guides/plugins/architecture), [Backend](/guides/plugins/backend), [Widget](/guides/plugins/widget), and [Settings](/guides/plugins/settings).
Talqui maintains a **public boilerplate** available at [`talqui-oss/talqui-plugin-example`](https://github.com/talqui-oss/talqui-plugin-example) that demonstrates a complete, working plugin: a backend (Node.js + Express) exposing REST routes and MCP tools, paired with a widget that operators use in the conversation sidebar. It is the fastest way to start, because it already implements all the contracts and patterns described in this guide. Clone it, replace the demo use case (an "ice-cream shop") with your own domain, and iterate.
The boilerplate is intentionally self-contained and can be hosted and published independently: it installs from the public npm registry and uses open-source dependencies and design systems.
***
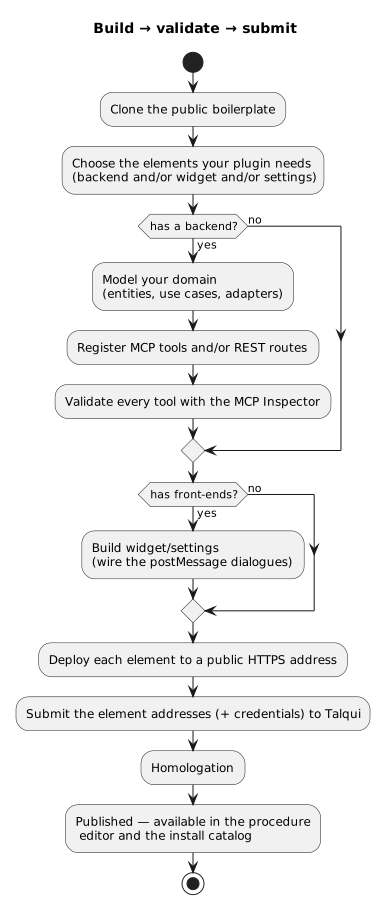
### Recommended workflow
#### Step 1: Clone the example
Start by pulling the public boilerplate from [`talqui-oss/talqui-plugin-example`](https://github.com/talqui-oss/talqui-plugin-example). This repository contains a complete, working end-to-end plugin (the ice-cream shop example) with all the patterns and best practices you need.
##### Request plugin credentials from Talqui
**Before you can run the backend locally**, you need to request credentials from Talqui. Email **[developer@talqui.com](mailto:developer@talqui.com)** and ask for:
* `PLUGIN_ID` — your plugin's unique identifier
* `PLUGIN_TOKEN` — authentication token for your plugin
* `PLUGIN_URN` — the plugin's URN (e.g., `urn:talqui:plugin:your-plugin-name`)
These credentials allow your backend to authenticate with Talqui's services and register at runtime.
##### Set up environment variables
Once you have the credentials, create a `.env` file in the `apps/api` directory with:
```bash theme={null}
# Plugin credentials (from Talqui)
PLUGIN_ID=your-plugin-id
PLUGIN_TOKEN=your-plugin-token
PLUGIN_URN=urn:talqui:plugin:your-plugin-name
# Talqui platform addresses (standard)
RTM_API_ADDRESS=https://message-socket.talqui.chat
REST_API_ADDRESS=https://api.talqui.chat
# Local development
NODE_ENV=development
PORT=3001
```
##### Start local development
Once cloned and configured, set up your local development environment:
```bash theme={null}
pnpm install # Install all dependencies
pnpm dev # Start all elements (backend, widget, settings) in development mode
```
The boilerplate is structured as a **pnpm monorepo**, so all apps start concurrently and are ready to test locally. The backend will boot with your plugin credentials and connect to Talqui's platform.
***
#### Step 2: Decide which elements you need
A plugin can include up to three elements, but you only build what your use case requires. Review the [Architecture](/guides/plugins/architecture) guide to understand the trade-offs, then keep **only the elements you need**:
* **Backend** (`apps/api`) — required if you need to read/act on your systems or expose MCP tools to the virtual agent
* **Widget** (`apps/widget`) — required if operators benefit from external context or actions beside the chat
* **Settings** (`apps/settings`) — required if you need per-tenant configuration
The example ships all three to demonstrate every pattern; your plugin will likely need fewer.
**You can literally delete the apps you don't need.** Remove the folders from the monorepo (`apps/widget`, `apps/settings`, or even `apps/api` depending on your use case), update the root `pnpm-workspace.yaml` to reflect only what remains, and you're done. No hidden dependencies—the boilerplate is designed to be cleanly decomposable.
***
#### Step 3: Model your domain
Replace the demo use case (ice-cream shop: flavors, stock, orders) with your own business entities and workflows. The boilerplate shows you exactly where to start:
* **Domain models and use cases** — replace in `apps/api/src/{domain,use-cases}`
* **Adapters and integrations** — replace in `apps/api/src/adapters` with calls to your external systems (databases, APIs, internal services)
* **Controllers** — keep thin; let them validate input, call a use case, and return a response
See the [`apps/api`](https://github.com/talqui-oss/talqui-plugin-example/tree/master/apps/api) folder of the boilerplate for concrete examples of how to structure this.
***
#### Step 4: Expose capabilities to both the agent and the operator
When a capability matters to both the virtual agent *and* the human operator, expose it **twice**: once as an **MCP tool** (for the agent), once as a **REST route** (for the widget or external clients). Both surfaces delegate to the same underlying use case, so business logic stays in one place and behavior stays consistent.
The ice-cream shop example demonstrates this:
* `StockList` — available as an MCP tool and as `POST /v1/stock/list`
* `OrderCreate` — available as an MCP tool and as `POST /v1/orders/create`
See [Backend](/guides/plugins/backend) for the full pattern.
***
#### Step 5: Build the UI (if needed)
If your plugin includes a widget or settings page, wire the **boot dialogue** — the handshake between your iframe and Talqui that exchanges context.
**For the widget:**
* Receive `widget:init` (your instance ID)
* Send `widget:acquire-session` (asking which conversation is open)
* Receive `widget:session` (the current conversation's context)
* Call your backend's REST routes, scoped to that session
See [Widget](/guides/plugins/widget) for details. The example's [`apps/widget`](https://github.com/talqui-oss/talqui-plugin-example/tree/master/apps/widget) demonstrates this fully.
**For settings:**
* Receive `plugin:settings` (the current configuration)
* Receive `plugin:environment` (your token and tenant context)
* Call your backend to validate, persist, or configure the tenant
See [Settings](/guides/plugins/settings) for details.
***
#### Step 6: Wire authentication
Ensure every API call uses the correct identity:
* **Plugin identity** — for cross-tenant operations (e.g., *"which tenants installed me?"*)
* **Plugin connection identity** — for tenant-scoped operations (the common case)
The exact header formats and encoding are documented in [Authentication](/guides/introduction/authentication).
***
#### Step 7: Validate locally
Before deploying, exercise every MCP tool and REST route with real inputs:
* Use the **MCP Inspector** to connect to your backend's `/mcp` endpoint, list tools, and call them with test data
* Manually test widget and settings UIs using the boilerplate's **development-only simulator**
This is exactly how homologation will test your plugin, so validate thoroughly.
***
#### Step 8: Deploy
Host each element you built on your own infrastructure:
* **Backend** — any Node.js-capable host (AWS Lambda, Heroku, DigitalOcean, etc.)
* **Widget & settings** — any static host (S3 + CloudFront, Vercel, Netlify, etc.)
All elements must be publicly accessible over **HTTPS**. See [Deployment topology](/guides/plugins/architecture) for detailed requirements.
***
#### Step 9: Submit your plugin
Your plugin is ready! For detailed instructions on how to submit your plugin to Talqui, including what we need to publish it, how to send your submission, and what the review process looks like, see [Submitting Your Plugin](/guides/plugins/submitting).
***
### Local development
The boilerplate is a **pnpm + Turborepo** monorepo. Once you have cloned [`talqui-oss/talqui-plugin-example`](https://github.com/talqui-oss/talqui-plugin-example), the typical development loop is:
1. **From the root directory**, run `pnpm install` to install all workspace dependencies.
2. Run `pnpm dev` to start all elements concurrently:
* The backend (`apps/api`) serves REST under `/v1/*` and MCP at `POST /mcp`.
* The widget (`apps/widget`) and settings (`apps/settings`) SPAs render in development mode.
3. **MCP validation** — run the **MCP Inspector** pointing to `http://localhost:3001/mcp` (or your backend port) to connect, list tools, and call them with test inputs. This is how homologation will test your plugin.
4. **Widget/settings testing** — because these SPAs normally receive context from Talqui over `postMessage`, the boilerplate ships a **development-only simulator** that plays the host side of the boot dialogue. This lets you test the UI standalone without needing a live Talqui instance.
For a step-by-step first run of the platform APIs, see the [Quickstart](/guides/introduction/quick-start).
***
### Understanding the example and customizing for your use case
The ice-cream shop example in [`talqui-oss/talqui-plugin-example`](https://github.com/talqui-oss/talqui-plugin-example) demonstrates every pattern this guide describes. As you build your own plugin, use the example as a reference:
* **Backend patterns** — browse [`apps/api/src`](https://github.com/talqui-oss/talqui-plugin-example/tree/master/apps/api/src) to see how MCP tools are registered, how REST controllers delegate to use cases, and how adapters connect to external systems.
* **Widget patterns** — the [`apps/widget`](https://github.com/talqui-oss/talqui-plugin-example/tree/master/apps/widget) shows the boot dialogue, how to call the backend, and how to open popups with `modal:show`.
* **Settings patterns** — [`apps/settings`](https://github.com/talqui-oss/talqui-plugin-example/tree/master/apps/settings) shows how to wire the `plugin:settings` / `plugin:environment` dialogue and persist configuration.
#### Customization examples
Here are common changes you might make to adapt the example to your domain:
| What you want to do | Where to start | Related pages |
| - | - | - |
| **Replace the ice-cream domain with your own** (orders, inventory, CRM) | Replace entity classes and adapters in `apps/api/src/{domain,adapters}` with your own models and external system calls. | [Backend](/guides/plugins/backend) |
| **Add a new MCP tool** for the agent to use | Register it in `apps/api/src/mcp/tools` alongside `StockList` and `OrderCreate`. Both MCP and REST versions are registered in the same use case. | [Backend › MCP](/guides/plugins/backend) |
| **Add new fields to the widget display** | Modify `apps/widget/src/components` to fetch and render new data from the backend. | [Widget](/guides/plugins/widget) |
| **Open additional popups** | Use `modal:show` in the widget (like the order form does) and add new `/popup/*` routes in the widget app. | [Widget › Popups](/guides/plugins/widget) |
| **Add per-tenant configuration** | Expand the settings page (`apps/settings/src`) to collect per-tenant inputs and call your backend to persist them. Modify the backend to read saved settings when authorizing requests. | [Settings](/guides/plugins/settings) + [Backend › Authentication](/guides/plugins/backend) |
| **Expose a new REST route** without an MCP equivalent | Add it directly to `apps/api/src/controllers` and register it on the Express app. Not every route needs both surfaces. | [Backend › REST](/guides/plugins/backend) |
Start by running the example end-to-end locally (see [Local development](#local-development)), exercise all its features, and read the code alongside the relevant pages of this guide. Once you understand how the pieces fit, adapt it incrementally for your use case.
Publish your plugin to the Talqui catalog.
Revisit the anatomy and the plugin-connection model.
Plugin and plugin-connection credentials.
Use the platform APIs in minutes.
This documentation is built and hosted on [Mintlify](https://mintlify.com), a developer documentation platform.