> ## Documentation Index
> Fetch the complete documentation index at: https://docs.talqui.chat/llms.txt
> Use this file to discover all available pages before exploring further.
# AI Capabilities
## Extending the virtual agent with custom tools
This use case shows how to give the Talqui virtual agent **new capabilities** — the ability to call your own systems, recognize patterns specific to your business, or integrate with external services — by deploying a backend-only plugin that exposes MCP tools. The plugin runs on **your infrastructure**, under your control, and Talqui simply discovers and invokes the tools you expose.
***
## Contextualization
Imagine an **e-commerce company** that manages inventory in a proprietary system. Today, when a customer asks the virtual agent *"Do you have this product in stock?"* or *"Where is my order from three days ago?"*, the agent cannot answer because it has no access to the company's systems. It falls back to a scripted response or hands off to a human.
With a custom AI Capabilities plugin, the company can teach the agent to:
* **Recognize** product availability directly from their inventory system
* **Act** by placing orders without human intervention
* **Identify** orders and track shipments in real-time
* **Reason** about customer data to make contextual recommendations
All of this happens without building a conversation widget, creating a settings page, or exposing REST routes. The agent simply gains new tools.
***
## Objective
Deploy **MCP tools** that the virtual agent discovers and calls autonomously, scoped to your internal systems. The agent becomes capable of:
* Reading your internal databases and APIs
* Taking actions (creating orders, logging tickets, updating records)
* Making decisions based on real-time data from your systems
* Conducting business logic that was previously unavailable to automated procedures
***
## What you'll build
A **backend-only plugin** that exposes an **MCP endpoint**:
| Element | Included | Purpose |
| - | - | - |
| **Backend (MCP endpoint)** | ✓ | Node.js service (or any language) that implements MCP `tools/list` and `tools/call`. Registers your custom tools. |
| **Widget** | ✗ | Not needed. Operators don't need a sidebar UI; the agent calls your tools directly. |
| **Settings page** | ✗ | Not needed. Configuration is handled internally or via your backend. |
| **REST routes** | ✗ | Optional. Only if external clients need to call your endpoints. For pure agent integration, skip it. |
You define what tools matter to your business and implement them however makes sense for your stack.
***
## How it works
### Step 1: Define your tools
Design MCP tools that the agent will call. Think about what information or actions your business needs the agent to have access to:
* `inventory.check` — query your stock system for product availability
* `order.create` — place an order in your system
* `order.status` — look up a customer's order and its current status
* `customer.profile` — fetch customer data for personalization
Each tool has a name, a description (which guides the agent when to call it), and JSON-Schema constraints for inputs.
### Step 2: Implement the backend
Build a Node.js (or any language) service that implements the [MCP protocol](/guides/plugins/backend). Register your tools, connect them to your internal systems, and expose the MCP endpoint on a public HTTPS address.
Example structure:
```
your-ai-tools/
├── src/
│ ├── tools/
│ │ ├── inventory.ts # inventory.check tool
│ │ ├── order.ts # order.create, order.status tools
│ │ └── customer.ts # customer.profile tool
│ ├── adapters/
│ │ ├── inventory-api.ts # calls your inventory system
│ │ ├── order-service.ts # calls your order system
│ │ └── crm-client.ts # calls your CRM
│ ├── mcp-server.ts # MCP server wiring
│ └── index.ts # Express app
├── package.json
└── Dockerfile
```
### Step 3: Deploy to your infrastructure
Host your MCP endpoint on your own servers — AWS, DigitalOcean, Kubernetes, on-prem, wherever makes sense. The only requirement is that it's publicly accessible over HTTPS and responds to MCP requests.
### Step 4: Register with Talqui
Submit your plugin to Talqui with **only the MCP address**:
```
Email: developer@talqui.com
Subject: Plugin Submission: [Your Company] AI Capabilities
Plugin Name: [Your Company] AI Capabilities
Description: MCP tools for inventory, orders, and customer data.
--- DEPLOYMENT ADDRESSES ---
MCP Endpoint: https://tools.your-company.com/mcp
--- AUTHENTICATION & CONFIGURATION ---
Authentication Header: Authorization: Bearer your-secret-token
(if required; leave blank if public)
```
That's it. No widget, no settings, no REST routes — just the MCP endpoint.
### Step 5: Tools become available in Talqui
Once approved:
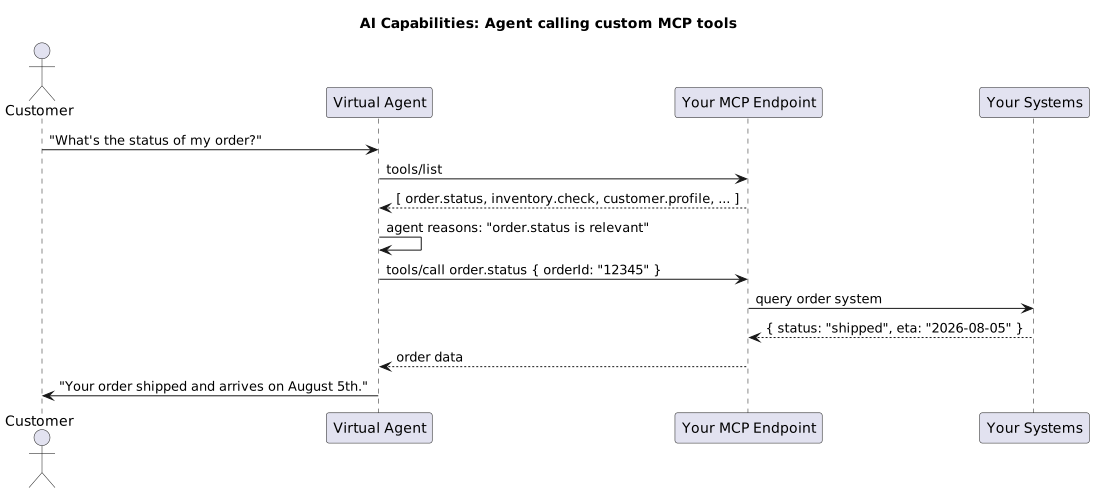
1. Talqui's virtual agent discovers your tools via `tools/list` at your MCP endpoint
2. The tools appear in the **Procedure Editor** as available steps
3. Operators can build procedures that instruct the agent to call your tools
4. At runtime, the agent calls your tools directly when it makes sense for the conversation
***
## The runtime flow
***
## Key points
* **Backend-only** — a plugin can be purely MCP tools with no UI or REST surface.
* **Your infrastructure** — you host and maintain the MCP endpoint. Talqui does not store your data or provide infrastructure support.
* **Autonomous** — the agent discovers and calls your tools without operator intervention. No widget needed.
* **Flexible** — tools can read, write, or trigger any action in your systems.
* **Reusable** — the same tools can be used by different procedures and different conversations.
***
## Infrastructure & support
**This is your responsibility.** You build, deploy, and maintain the MCP endpoint on your infrastructure. Talqui only calls the public HTTPS address you provide; it does not host, monitor, or support your service. If your endpoint is down or slow, it impacts the agent's performance — and you own that. Set up monitoring, redundancy, rate limiting, and logging as you would for any production service.
If you want Talqui to handle infrastructure, consider building a full plugin with a backend that Talqui's homologation team can validate and support (see [Getting Started](/guides/plugins/getting-started)); but for autonomous MCP-only tools under your control, you are responsible.
***
## Example: complete tool definition
Here's what one MCP tool might look like:
```json theme={null}
{
"name": "order.status",
"description": "Get the current status and details of a customer order. Use this when a customer asks about their order delivery, status, or tracking information.",
"inputSchema": {
"type": "object",
"properties": {
"orderId": {
"type": "string",
"description": "The order ID (e.g., 'ORD-12345')"
},
"customerId": {
"type": "string",
"description": "The customer ID who placed the order (optional, for verification)"
}
},
"required": ["orderId"]
}
}
```
When the agent calls this tool with an `orderId`, your backend looks it up in your order system, validates it, and returns:
```json theme={null}
{
"orderId": "ORD-12345",
"status": "shipped",
"shippingDate": "2026-08-01",
"estimatedDelivery": "2026-08-05",
"carrier": "FedEx",
"trackingNumber": "1234567890"
}
```
The agent reads this response and answers the customer naturally.
***
## Comparison: when to use this pattern
| Pattern | Use when… | Example |
| - | - | - |
| **AI Capabilities (MCP-only)** | You want the agent to call your systems **autonomously**, with no operator UI needed | Inventory checks, order lookups, customer profile reads |
| **Backend + Widget** | Operators need to see external data and take actions **beside the chat** | CRM sidebar during calls, ticket creation UI |
| **Backend + Settings** | Each tenant needs **per-tenant configuration** | API keys, field mappings, feature toggles |
You can combine patterns — a plugin can have all three — but the simplest path to agent automation is MCP-only.
***
## Next steps
1. Review [Backend › MCP](/guides/plugins/backend) to understand tool design and the MCP protocol.
2. Start with the MCP portion of the [`talqui-oss/talqui-plugin-example`](https://github.com/talqui-oss/talqui-plugin-example/tree/master/apps/api/src/mcp) to see concrete tool implementations.
3. Build your tools, test them with the MCP Inspector, and deploy to your infrastructure.
4. Submit your MCP endpoint to Talqui via [Submitting Your Plugin](/guides/plugins/submitting).
Backend + Widget for operators.
RTM bridge for real-time events.
Deep dive into MCP tools and tool design.
Register and publish.
This documentation is built and hosted on [Mintlify](https://mintlify.com), a developer documentation platform.